Open or create a workspace
A workspace is a project folder that DataStar knows about. It holds your SQL scripts, the templates that generate them, and a .ds/ subfolder with workspace-local settings. One DataStar installation can have many workspaces.
Create a new workspace
Workspace creation is driven from the DataStar - Get Started dialog that appears when DataStar starts (and any time no workspace is open). There is no separate New Workspace dialog; creation is a single picker.
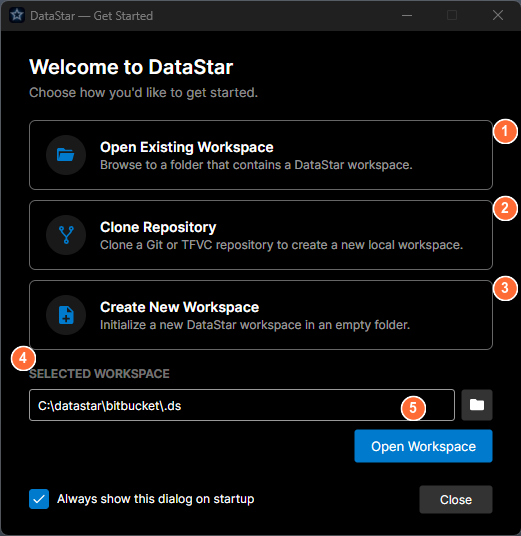
- Open Existing Workspace: browse to a folder that already contains a
.ds/subfolder. - Clone Repository: pull a workspace from Git or TFVC and open it in one step.
- Create New Workspace: initialize a new workspace in an empty folder.
- Selected Workspace: shows the path of the most recently opened workspace.
- Open Workspace: open the workspace shown in the path field.
To create a new workspace:
- From the DataStar - Get Started dialog, click Create New Workspace.
- Pick a folder on disk. If the folder isn't empty, DataStar only adds its own
.ds/subfolder next to whatever's already there. If the folder doesn't exist yet, DataStar creates it. - DataStar uses the folder name as the initial workspace name. You can change this later from Workspace → Settings → General.
Use Clone Repository, also on the DataStar - Get Started dialog, to pull an existing workspace directly from Git or TFVC instead of creating a new one. See Open an existing workspace below.
Open an existing workspace
If someone else already created the workspace and it's in your source control, you have two options.
Option A: Let DataStar clone it for you. On the DataStar - Get Started dialog, click Clone Repository and point it at the Git or TFVC repository. DataStar pulls it to your chosen folder and opens it as a workspace in one step.
Option B: Clone manually, then open. If the repo is already on disk (for example, you cloned it from the command line):
- From the DataStar - Get Started dialog, click Open Existing Workspace, or from an open workspace use Workspace → Open Workspace.
- Point at the folder that contains
.ds/.
DataStar reads the workspace configuration and opens it with whatever templates and settings the team checked in.
What's stored where
| Location | What lives there |
|---|---|
<workspace>/.ds/workspace.json | Workspace configuration: name, paths, formatting rules, template locations. Commit this. |
<workspace>/templates/ | Your XML templates. Commit these. |
<workspace>/components/ (or configured path) | Generated SQL scripts. Commit these. |
%APPDATA%\DataStarV3\<workspace-hash>\ | Per-user cache and drafts. Don't commit; local only. |
The .ds/workspace.json and templates/ and components/ folders are all version-controlled so every team member sees the same structure.
Workspace settings
Open Workspace → Settings to adjust settings that apply to this workspace. The dialog has five tabs:
- General: workspace name, task-ID requirements, line-ending rules, reversal mode, branch association and branch-name regex, and the names of the deployment history tables (audit, reversal, summary).
- Paths & Filters: where components and reversal scripts live on disk, which template directories are active, and path filters that weight or cloak parts of the tree.
- Formatting: file-name case rules, single-space enforcement, and search/replace rules applied to component names during extraction.
- Release: where deployment files are stored (task attachment or workspace folder), folder pattern, Git tag label format, and Azure Pipelines trigger configuration.
- Metadata Tables: dictionary and catalog tables that DataStar exposes to the MCP server for AI clients. Workspace-scoped and team-shared.
Database connections themselves are stored per Windows user, not per workspace and not shared across a team. They live in %APPDATA%\DataStarV3\databases.json and are visible to every workspace you open under the same Windows login. Add or edit them under Workspace → Connections → Database. The workspace only stores a preference for which of your saved connections to auto-connect on open.
Each tab is covered in more detail under Settings in the sidebar.
What next
- Install DataStar if you haven't already.
- Your first release, once you've got something to ship.